Share
Imagine standing on a beach, walking on the moon, and diving in the sea — all in the same video.
You don’t have to actually visit each of these places to film. With green screens, you can swap out your background for almost anything you can imagine, in editing. Learn how to use a green screen to add visual dynamic effects to elevate your content.
What Is a Green Screen?
A green screen is a large backdrop for photos or videos, usually made out of green fabric, that you can replace with any image. You simply film or photograph in front of it, then use an editing technique called chroma keying to replace the color, keeping only the people or objects you want. Then, you add a new background to where the green screen was.
Traditionally, green screen backgrounds are physical screens that you have to set up and take down. However, apps like TikTok and Instagram have built-in functions that remove your background for you — usually called a “green screen” feature, even if there’s no green involved. The background removal won’t be as exact, but it does the job.
With features like these, you don't need to leave your home studio to create diverse and exciting content — in fact, you don’t even need a home studio. Green screens open up a whole new world where you can digitally showcase objects, locations, and images to better explain a concept or tell a story. For example, a TikToker reviewing a clothing website could replace their background with images of their favorite pieces so viewers can see exactly what they mean, or you could film a comedic skit set in the Arctic and add the tundra to the background for dramatic effect.
Why Does a Green Screen Have to Be Green?
Bright green stands out from most other colors, which means the editing software can easily find and separate the green from the rest of the image. You can also use a blue, black, or dark-colored screen. However, bright green is the popular choice because it isn't a common color for clothing or props.
During editing, anything the same color as the green screen disappears, and an uncommon color is less likely to match things in the scene, like people’s outfits. If you used a navy screen and someone on camera wore a navy sweater, their torso might become part of the background.
How Does a Green Screen Work?
You record in front of the green screen, then remove the green editing using chroma keying to add your own background. This is the process that lets you select the color you want to replace — usually green — and swap it with a different video or image.
Here's how it works:
- Record in front of a green screen.
- Choose or record footage for the new background.
- Select an editing software that supports chroma key editing, like iMovie, Final Cut Pro, or Adobe After Effects.
- Upload both videos or photos to the software.
- Use your chosen software’s chroma key editing tool to select the color you want to remove and replace. This leaves only the people or items that aren’t that color (like the things that aren’t green) in the video’s foreground.
- With the overlay or composite function, combine the first video with the edited-out green screen with the video or image you’d like to use as the background.

How to Do a Green Screen
Here’s how to set up a green screen, record video, and edit your footage:
1. Set up the Green Screen
Buy a fabric or paper green screen and set it up in the area you want to record in. You can also use green paint, but that might be a big commitment unless you want to dedicate that area to green screen recording. Then, set up your camera and make sure the green area fills the whole shot.
If you’re using fabric or paper, ensure that it’s flat and has no holes or wrinkles. Imperfections can create shadows and uneven lighting on the green screen, while a smooth surface creates a consistent background for better visual results.
2. Arrange Your Lighting
Soft but sufficient light creates even brightness, getting rid of those imperfections we mentioned above and making it easier for editing software to accurately remove the background. It’s an extra step, but it’ll result in a smoother, more polished video.
Here’s how to achieve soft, even lighting when using a green screen:
- Outdoors — If you can, use a diffuser to soften the light to avoid harsh shadows. A light diffuser is a semi-transmittant (partly see-through) material that you place between the light source and the subject you’re filming, diffusing the light as it passes through. This means direct sunlight won’t be as harsh.
- Indoors — Ensure the lighting you’re using hits your screen evenly. If you’re filming in front of a window, make sure the light is soft and direct, and if you’re using a ring light or other source, place it in a central location. This minimizes shadows and achieves a more natural, high-quality final video.
3. Record Your Footage
When filming, check your camera to see how the green screen looks, and fix any gaps or wrinkles. Record several takes, so if you notice any technical issues with one piece of footage during editing, you can use another or edit the takes together. Having many options will save you time and avoid setting up again to re-record footage.
4. Edit and Remove the Green Screen
The editing process may differ depending on the software you use, but this is generally how to do it:
- Transfer your recorded footage to your preferred video editing software.
- Drag your first video clip to the timeline.
- Locate and select the chroma key or green screen effect, usually in the effects or video transitions panel.
- Use the color picker or eyedropper tool to select the shade of green in your footage, telling the software which color to make transparent.
- Fine-tune the keying effect by tweaking the light and color settings.
5. Add Your New Background
Once you remove the green screen:
- Select the composite or overlay tool within the editing software.
- Add the desired background to replace the green that you edited out.
- Tweak the lighting, hue, and sharpness of the background video and the original so they match. For example, if you’re adding a sunny beach background, you may need to brighten the original video so it also looks sunny and warm.
- Export your video in your video format of choice.
How to Use Built-in Green Screens on Popular Social Media Platforms
Social media apps like TikTok, Instagram, and YouTube have green screen filming features. You don’t have to film with an actual green screen — the software will automatically detect and remove your background. The functionality is limited, and the quality isn't as polished and professional, but it’s quick and easy to do if you're short on time.
TikTok Green Screen
Here’s how to create TikTok videos using the built-in green screen:
- Within TikTok, tap the “+” button.
- Choose “Effects,” and under “Trending,” search for the #greenscreen icon.
- Select a photo from your phone library to use your background. TikTok also has a few images and videos you can use and experiment with.
- Hit record to start filming your foreground video.
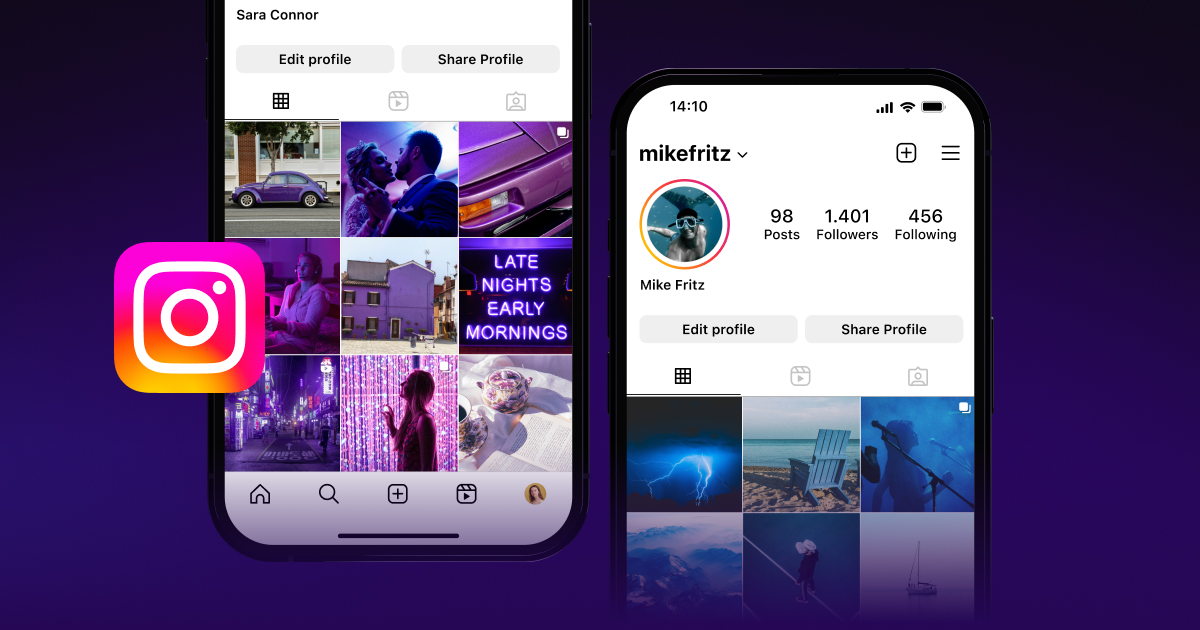
Instagram Reels Green Screen
A green screen feature is also available on Instagram Reels. Here’s how to use it:
- Tap the “+” at the top right corner of your profile page.
- Select “Reel.”
- Select “Effects.”
- Tap the sparkle effects icon.
- Tap on the magnifying glass icon and search “green screen.”
- Select the green screen effect and tap the bookmark icon to save to your Reels’ effects menu.
- Tap the green screen icon to apply the effects.
- Return to your Reels screen to create your Reel.
- Tap “Add Media.”
- Choose a video or photo for the background from your camera roll.
- Tap the camera swap icon at the bottom right corner of your screen to add yourself to the video and start recording.
- Click the stop button and “Next” to save.
YouTube Shorts Green Screen
You can also use a YouTube Short or other video as a background for a new YouTube Shorts clip. Here’s how to do it:
- Go to YouTube Shorts in the app.
- Click the “+” at the bottom.
- Select “Create a Short.”
- YouTube will take you to the recording screen. Tap to flip your camera to face you in selfie mode.
- Click on “Green Screen.”
- Choose a background from your uploaded content at the bottom of your screen.
- Tap the red square to start recording.
- Edit your YouTube Short as usual and click “Next.”
- Add your details, including the title, and tap “Upload.”
Best Color To Wear for a Green Screen
It might seem obvious, but avoid wearing green while using a green screen. If your clothing is a similar shade, it’ll blend in with the background and disappear along with the green screen during editing. This includes shades of green that are similar because these could cause a distorted or partially transparent appearance.
Wearing dark colors such as black, navy blue, or brown is better, as they contrast well with bright green. You should also avoid shiny outfits, like something with a lot of sequins, because they might reflect the color and create distortion in the final video.
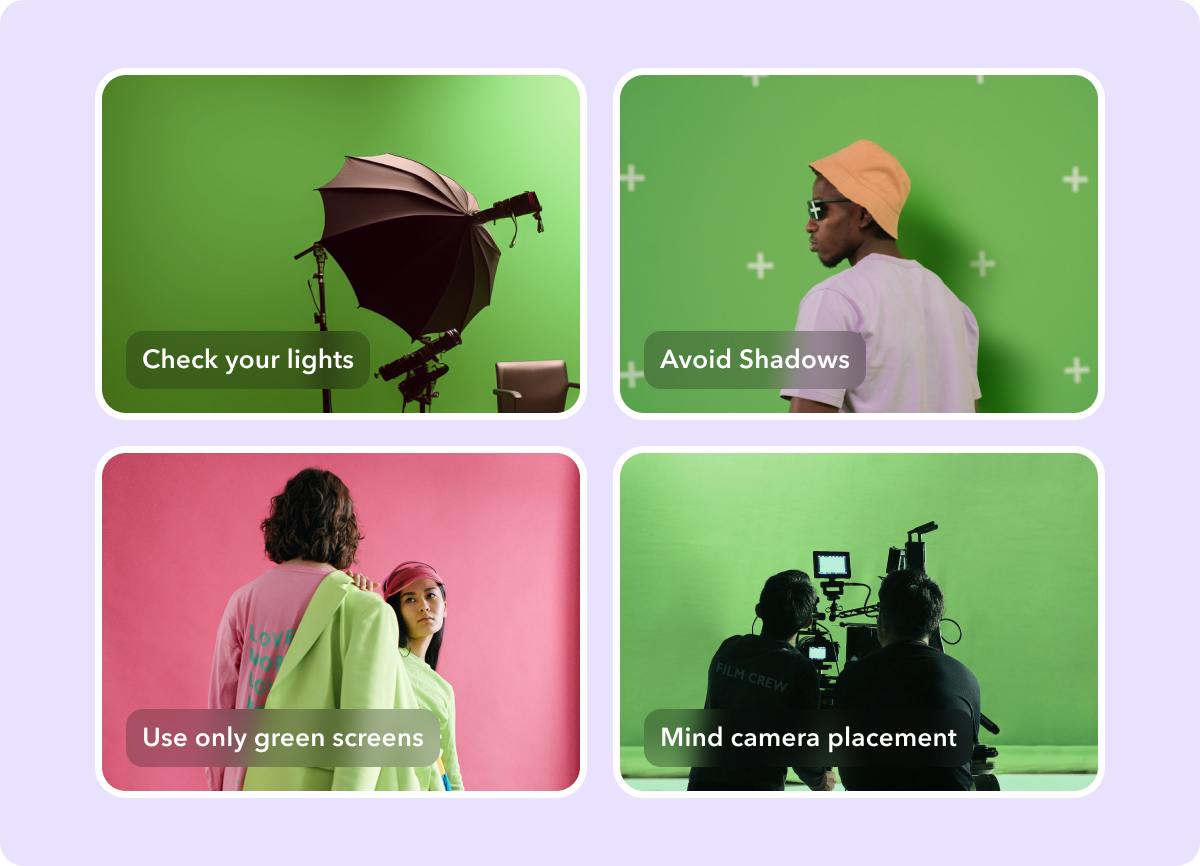
3 Green Screen Tips
For social media, your green screen might not have to look 100% realistic. However, if you want to seamlessly integrate your subject and background when creating something, here are some ways to achieve a polished video:
- Prioritize lighting — To be convincing, your lighting must be consistent in foreground and background footage. Matching lighting in your videos as closely as possible ensures a realistic, high-quality result.
- Match the camera distance — The camera distance (also known as the depth of field) between the subject and background should be the same in both your green screen and background videos. This makes your subject look like they really were in that environment during filming, which creates a more believable final video.
- Stabilize your footage with a tripod — Your camera must remain stable and focused for a smooth video. A shaky video camera in the foreground will contrast the stability in the background and distract viewers. Stable focus keeps viewers’ attention on the subject and the story.
Use Captions to Effortlessly Edit Your Content
A green screen is a good tool for creating professional, appealing content — but it takes time and practice to get the hang of studio-grade editing.
To continue elevating your green screen content, check out Captions. You can use AI tools like automatic captioning, eye contact adjustment, and speech correction for content creation that’s 10x faster. Focus on choosing a new engaging background and entertaining your audience, instead of spending hours editing.
By
January 29, 2024
-
9
Min Read
Stay in the loop
Subscribe to our newsletter and get all the news from Captions. No spam, we promise.
Oops! Something went wrong while submitting the form.
Professional videos made easy