YouTube transcripts help viewers quickly find information and better understand what the video’s about. Ensuring viewers can get a transcript of your YouTube video also promotes greater accessibility, appealing to visual learning styles and various hearing abilities.
Discover how to create and download a transcript from YouTube.
Why Use Transcripts and Captioning in YouTube Videos?
The option to read a record of a video’s spoken words provides several opportunities to optimize your content’s impact. They’re a valuable resource to improve:
- Accessibility — These write-ups enhance accessibility for deaf individuals and those who do not speak English, enabling them to engage with YouTube content. Increased accessibility expands a video’s sphere of influence, extending it to a broader audience.
- YouTube SEO —YouTube’s algorithm ranks videos based on factors like engagement, watch time, and keyword use. Transcripts improve search engine optimization (SEO) by letting the YouTube algorithm interpret the text to understand what your video is about — this increases your content’s chance of being promoted by the algorithm. YouTube transcripts also contain valuable anchor text you can use for internal links to your website or other social platforms. These links direct your viewers to relevant content for further engagement with your channel.
- Audience engagement — Transcripts increase engagement by holding the audience’s attention and letting viewers scan a video’s content for the main points. This added value encourages connection with the video and may lead viewers to recommend or promote it.
- Viewing experience — Text enhances the viewer experience by offering multiple ways to take in with the video content. Rather than relying on pausing, rewinding, and fast-forwarding video, viewers can read and reread the transcript at their leisure. This is especially helpful with dense tutorials containing numerous steps, such as DIY and educational content, as it lets viewers fully comprehend the written instructions and easily refer back to them.
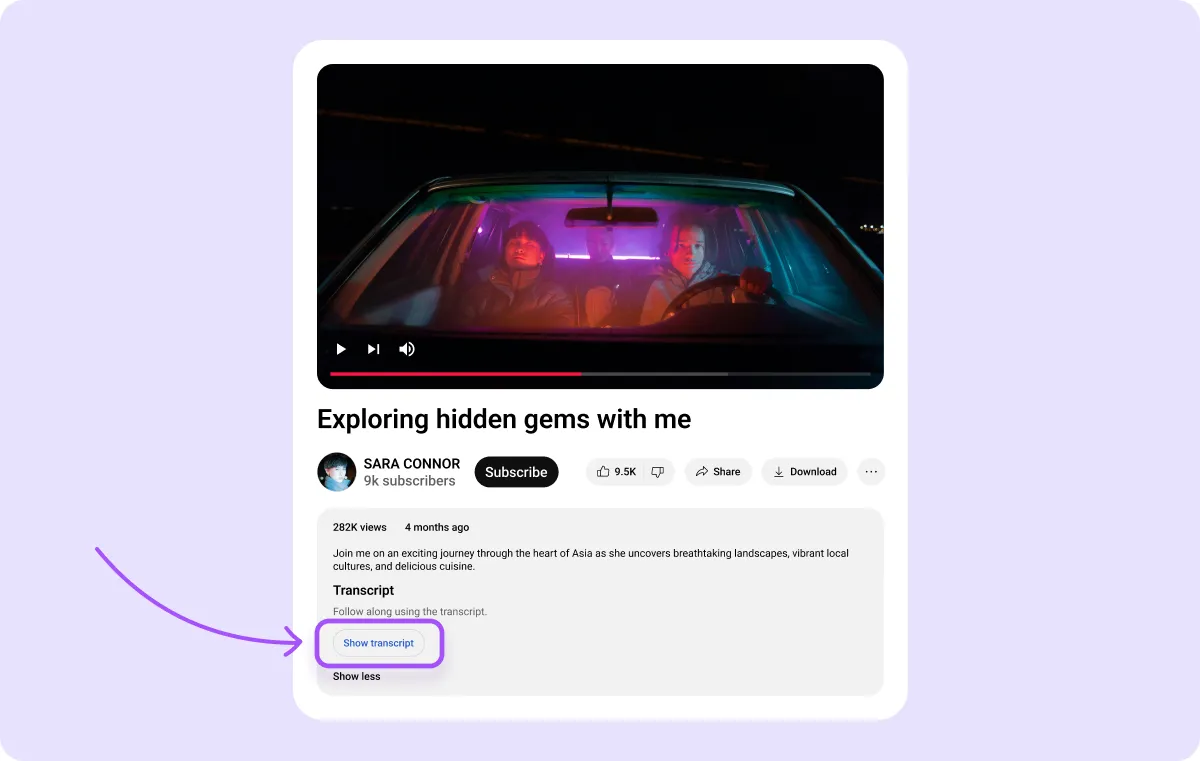
By default, transcripts are hidden — you can view them by opening the video description box and clicking the “Show Transcript” button. Although YouTube automatically generates transcripts based on video audio, some content creators prefer to upload manually. Whether you use YouTube’s automatically generated write-ups or write your own, it’s wise to edit the text to confirm accuracy.
To move beyond transcripts and further enhance your content, add captions to your YouTube videos. Captions improve accessibility for deaf or hard-of-hearing viewers, audience comprehension, and SEO. Many viewers watch videos at low volume or without sound, so captions help them understand content at a glance.
How to Find a Transcript on YouTube
Here’s how to copy a transcript from YouTube instead of creating one.
1. Select the Video
Navigate to YouTube on your desktop or mobile device and log in to your account. Search for a video you want the write-up of — most long-form narrative content has one. In contrast, shorts and music videos usually don’t provide transcripts.
2. Click “...More”
Tap on “More” in the description box below the video.
3. Select “Show Transcript”
Scroll down to the bottom of the description box. If the video offers transcripts, you’ll see the “Show transcript” button beneath the text, reading, “Follow along using the transcript.” If it doesn’t, you won’t see this button. This section is directly above the channel link and the “Videos” and “About” buttons.

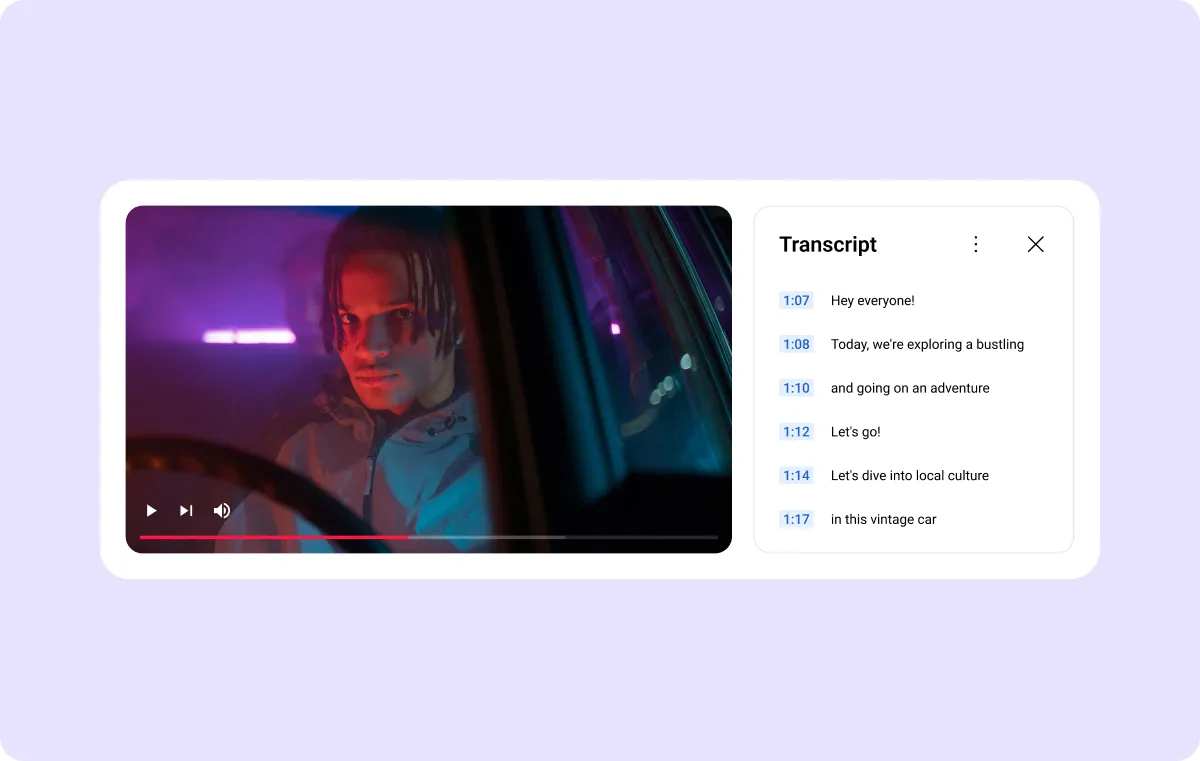
Once you click “Show transcript,” it’ll appear to the right of the video. The transcript box will highlight the text and timestamp as the audio plays. You can turn timestamps on and off by clicking the “...” button in the top-right corner and selecting “Toggle timestamps.” Click a timestamp to jump to that part of the video.

4. Adjust the Language
For videos that use YouTube’s auto-generated transcript feature, the write-up defaults to the spoken language in the video. Audio in English will provide an English version, while a video in Spanish will generate Spanish text.
Some videos provide transcripts in multiple languages. You can tell if one offers text in other languages by clicking the “Language” button in the bottom-left corner of the transcript box. Select the language you want, and the write-up will automatically adjust.
5. Download the Transcript
Currently, YouTube only lets you download a video’s transcript if you own the video.
To download the script for content you don’t own, copy and paste the transcript into a text editor like Google Docs or Microsoft Word. You can also use a browser extension like Google Chrome’s YouTube Transcript Extractor.
How to Get Transcripts for Your YouTube Videos
Here’s how to view your YouTube video’s transcription:
- Navigate to YouTube and log in to your account.
- Click on your profile in the upper-right corner of your browser window and select “YouTube Studio.”
- Select “Subtitles” on the left-hand side of your browser window — transcripts and subtitles fall under the same menu.
- Select the clip you want scripts for and set the language, if necessary.
- Download, edit, or delete the transcript or add a new one in a supported language.
While YouTube automatically generates transcripts, you can create them by:
- Auto-syncing video audio
- Typing manually
- Uploading a text file
Let’s explore these options in greater detail.
Auto-sync
If you have a full script, you can use YouTube’s auto-sync feature to generate transcript timestamps — digital time indicators that record when audio occurs in the video. Here’s how to use auto-sync:
- Open a video in the Subtitles tab and click “Auto-sync.”
- Type or paste your full transcript in the text box.
- Click “Publish,” and YouTube will automatically set your timings.
Manual
While labor-intensive, manually typing out transcript text as you watch the video enables you to precisely dictate audio text and timestamps. After you create the text, edit the timings. Here’s how to do it:
- Open a video in the Subtitles tab and click “Type manually.”
- Type your transcript in the text box as the video plays.
- Click “Edit Timings” to adjust the timestamp for each text block.
- Click “Publish” to save your script file.
Text File
This requires more upfront work but produces the most accurate transcripts. YouTube supports various script file formats, including .srt and .vtt. Follow these steps to upload a transcript file with or without timing:
- Open a video in the Subtitles tab and click “Upload file.”
- Choose between “With timing” and “Without timing.”
- Select your source file and click “Open” to upload the file.
- Review and edit the text and timings, then hit “Publish.”
5 Tips to Create Effective Transcripts for YouTube
Whether you use YouTube’s auto-generated transcripts or create your own, here are five valuable tips for getting the most out of your YouTube write-ups:
- Record high-quality audio — Auto-generated YouTube transcripts vary in accuracy depending on the audio quality, and high-quality, clear audio is easier to transcribe precisely.
- Reduce background noise — Background noise interferes with text accuracy, impacting SEO and the viewer experience by potentially leaving out or mis-transcribing essential keywords. Leverage a background noise tool like Captions’ Denoise feature to eliminate distracting sound and improve text accuracy.
- Speak clearly and slowly — Even the best auto-transcription tools struggle to transcribe words if you speak quickly or unclearly. Projecting and enunciating each word improves your script quality.
- Identify speakers in the video — Auto-generated transcript tools struggle to identify words if a video contains audio from multiple speakers. Make transcription more effective by identifying the speakers in your video. You can manually edit your scripts to name who’s speaking and when.
- Edit transcripts for accuracy — Always check your transcripts to ensure accuracy. Edit the copy directly on YouTube or download it into a text editor to correct spelling and grammar mistakes.
Make Your Content More Accessible With Captions
Transcripts enhance content by improving accessibility, viewer engagement, and SEO. Elevate your videos and get more subscribers with Captions’ AI-powered tools.
With Captions, you can add text and subtitles to your videos in just a few clicks, making your content more accessible and dynamic. You can also download transcripts off Captions and upload these to your YouTube videos.
Sign up today and transform your videos with Captions’ creative studio.


